Monday 26 August 2013

Summer Brief Thought Process

I decided to brainstorm what I wanted from 3rd year as a basis to thinking of briefs. I noted down possible options that I had already as well as subject topics that I was interested in designing for. I also thought of what kind of design I wanted to do which predominately was branding and packaging. Other areas that I wanted to explore more was illustration and photography as I touched on these last year and I wanted to develop them further into my work. I thought of things i'm currently interested in and what summer has kind of brought about which is mainly restoration projects, travel, interior design and getting back to crafting things. I want this year to be more about my interests and design coming together so I enjoy the practical side more.


I also started looking at my branding after ending on it last year. I noted down what I wanted to come across in my branding: simple, professional and concepts. I then thought about my own interests, hobbies and personality which could be built on and into my branding or ways of showing these aspects of me. I think that a very important part of networking and displaying yourself as a designer is you not just your work so I want to create ways of communicating these aspects of my life. 

I looked at what I did for my branding at the end of second year and picked out the 'HI symbol which was my favourite aspect. I wanted to build on my branding carrying forward this logo but to redesign the visual aspects I had created with a large focus on the digital aspect as I didn't actually make a website. 


I looked at websites for inspiration and picked out key things about the designs which I favoured.

 I found inspiration of colours from a section of a wall piece of designs I created in my bedroom. The neutral tones and compressed stock would well for the atheistic I was going for. I drew colours from a photograph (along the right) and then revised them (along the bottom).

I looked at different combinations of these colours as a working palette for my branding. When I had a selection I was fond of I then tried it with very faint tones as a base of the site which I then added a dark brown tone to for a near black defining colour which would be good for text.
I put the base tones against the rest of the palette as it was going to act as a base. One of my nicknames is Bilbo so I thought of using this as my logo instead of the initial 'HI I had created. I tried finding a typeface for what I was going for but struggled.

 In the initial brainstorm I had thought of surrounding the 'HI logo within a shape so I had thought of a circle and a square but also a combination which formed a new shape which mainly curved but with one point. When playing with the nickname Bilbo I noticed the shape in the B and how they could create a bespoke typeface for the logo. Fitting it into another typeface however didn't work how I had hoped so I could have to create it myself.

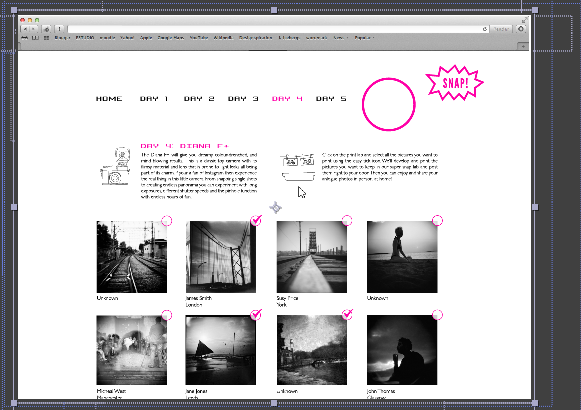
Concentrating on the web aspect of my portfolio I created a navigation of what would be on the site. I then drew up some different designs focusing on the atheistic aspects I had already discovered I wanted to use to display my branding list: simple, professional, concept. 


Going back to what I wanted to do in third year, from the topics I had listed I broke down and placed them under the area of design I was interested in and what they would in tail. 


This set me up to then go on and write briefs with a key focus on what subjects and what type of design I was planning for my portfolio.


Brief 1: I wanted to create a high end fashion label with an advertising campaign as I love the clean, strong visual design that the market currently holds as well as the extravagant window displays and store interior. It has always been something that has interested me and that I have been influenced by from a young age due to my mothers career therefore I feel it will be a topic I will enjoy experimenting with. This could lead me to get very creative with the concept of the brand as well as the packaging and campaign. With the different routes to go down and explore I feel that this will be a long time period brief to really develop the brand to be strong and designed across lots of different outputs.


Brief 2: I love packaging and the packaging of things which include gifting. Different stocks and materials can be given new purpose with a bit of experimentation and thought and gifting can bring about a concept eg. presents are themed with the packaging. My plan with this is to create a brand which bring all the simple fundamentals together under one range.


Brief 3: With my interest and new obsession with interior and restoration projects I thought that a home furniture store would be a perfect subject for me to focus it into my design aspirations. I felt that combining the branding with a campaign would help bring my concept skills to light as well as strengthen them in the area of marketing brands.


Brief 4: I wanted a brief that was going to be open and would allow me to be creative as well as bring about aspects of my personality to my portfolio. I had ideas in mind when writing this brief but I wanted it to allow me to be inspired by what I meet in life as I often meet with things that inspire me from day to day experiences. As this is an aspect that really defines my thought process and fuels my creativity I wanted a brief to explore and demonstrate it.


Brief 5: With the new obsession with own brand products with large brands, in particular supermarkets, offering cheaper basis products I decided that I wanted to design an own brand. Mainly because of its current popularity in design but also because it means having to design something to look cheap rather than luxury which changes the design atheistic completely. I struggled however to think of a brand which doesn't have it's own brand already as the market has already been taken full advantage of. I then thought of Selfridges, a company who's design and branding I love. I therefore wrote out a brief for a 'super posh' range which would take on the atheistic of own brand products. However I felt that this ended up being confusing as I had to keep the brands history and reputation which is luxury products and expense but create a cheap own brand range. This didn't seem a plausible avenue the brand would take necessarily unless it was a novelty range.


Brief 5: Due to the confusion in the last brief I wrote I looked back at the subject list I wanted to do to get myself back on track. After thinking about Selfridges I really wanted to do something with there brand and when looking back I noticed I had wrote makeup/skincare. This then led me to write a brief about an own brand make up/skincare range for Selfridges called 'Self'. This seemed a much more appropriate avenue for the brand and a more realistic brief in the industry. The initial brief still has a lot of desire to me and feel it could be a follow on brief if it was more thought through and pinned down. 


After writing the briefs ideas formulated and I started to capture ideas and thoughts so I didn't forget.

Thursday 8 August 2013

Level 06: Summer Brief


Extended Practice (OUDG603)
page1image25640
Eight studio briefs, to be completed thoroughly and to a standard where the context and outcomes are made clear. Please use the brief template attached.
Each brief requires a reading list.


(During the first weeks of term, there will be workshops to help you refine and direct the studio briefs further.)
Consider the range of briefs that you are planning to undertake, they should have different time scales, production values and skill sets...
Who is your intended audience?
Is there a skill set you wish to develop?

How are you challenging yourself? What do you need to learn?
You are required to enter one competition brief (YCN, D&AD, ISTD etc...), similar to the Responsive module, these briefs will be published at a later date but it might be worth investigating the types of competition briefs each competition has set previously.
You are required to work on one collaborative brief.
You are required to work on one live brief (not competition brief). This year there will be briefs set by agencies, who will come into the studio to brief you and give feedback on the outcomes. You will be required to work on at least one of these briefs.


page1image40304
PPP3 (OUGD602)

A ten minute presentation, building on your end of level five presentation. This will include:
  • A STATEMENT ABOUT YOU AS A DESIGNER.
  • THE STUDIO BRIEFS YOU ARE PROPOSING FOR LEVEL SIX.
  • THE RESEARCH AND DIRECTION FOR CoP LEVEL SIX.
    Your direction for level six. Ideally it will be as focussed as possible, but at times it may be appropriate to give an overview.
    What you plan to learn, what you need to learn, how you intend to learn this? Is there a sector you are interested in engaging with?
    Who are your audience?
page2image552
page2image1248
The additionality you are adding to your programme of study? (What conferences, lectures, exhibitions and events etc... do you intend to engage with?)
Collaboration, who do you want to work with, why do you want to work with them?
This year you are REQUIRED to undertake a placement(s) for a minimum of two weeks, these weeks can be taken during term time through negotiation with staff if required. You will need to propose studios/agencies/community groups/organisations that you intend to contact and why they are appropriate to you and your work? Be realistic and practical with these...a placement is a requirement for this year. (paperwork supporting your placement will be given to you in due course)
page2image8288
page2image8984

Deadline
page2image10264
page2image10960
30th September 2013
page2image13520 page2image14112

I thought I would answer the questions provided in relation to all the briefs so that when I select ones I wish to 

Who is your intended audience?

- multidisciplinary studios
- packaging studios
- branding studios


Is there a skill set you wish to develop?


- conceptual work
- production of products eg. printing

How are you challenging yourself? What do you need to learn?

- topics i've not approached with design previously
- bring in my personal interests into what I choose
- produce actual final products
- learn production skills in printing and binding etc
- how to rebrand
- photograph work


You are required to enter one competition brief (YCN, D&AD, ISTD etc...), similar to the Responsive module, these briefs will be published at a later date but it might be worth investigating the types of competition briefs each competition has set previously.

D&AD - advertising/digital/packaging brief eg. similar to that of 2013's Ted Baker, L'artisan, BBC
READ ALL BRIEFS PROPERLY BEFORE CHOOSING

YCN - packaging brief eg. similar to Feel Good Drinks 2013

You are required to work on one collaborative brief.

Courses: furniture/photography/fashion

You are required to work on one live brief (not competition brief). This year there will be briefs set by agencies, who will come into the studio to brief you and give feedback on the outcomes. You will be required to work on at least one of these briefs.

JKR internship competition

Tuesday 21 May 2013

Design Practice 2: Evaluation

What skills have you developed through this module and how effectively do you think you have applied them?

I have defiantly learnt new skills in the way I generate concepts and how this then influences my designs. I used to look at definitions and thesaurus last year but I lost that this year until we did the workshops. It has enabled me to think more creatively about concepts, approach them differently and has informed my designs. I think I effectively applied this particularly to what is good as I initially looked into a range of ways to approach this brief e.g. packaging, exhibition etc. Then when I had chosen my direction of an exhibition, in easter I thought through lots of different concepts for what the exhibition could be. From this I chose three and sketched ideas of how the concept could be applied to different formats. This meant I was prepared for the concept crit and the feedback really informed my next decisions as well as strengthened my concepts more. By having the concept in order it meant I could strengthen it and apply it more effectively with more time to the designs and formats. This can be seen in the atheistic of my products as well as the context and format they take. Another skill is organisation as this module was aligned with a lot of others and deadlines of modules. As I had big ambitions for this project of producing several different formats, which isn't my forte, screen printing, again not my strongest and lack of experience, and stitching which is incredibly time consuming I had to manage my time effectively to make sure my other modules didn't suffer and that I met crit deadlines. I manage to organise my time without other modules suffering by booking print slots at stages and designing in order so that I produced things that needs to be screen printed first. I also printed both for screen printing and for print so that I had two types of processes but also a back up if screen printing didn't work. This meant my final pieces weren't rushed and I got to spend more time on producing them properly and solving any problems which resulted in better quality final pieces.


What approaches to methods of design production have you developed and how have they informed your design development process?

A method of design production I have developed is screen printing as I did the whole process from the beginning till end with paper and fabric. I learn to strip and coat the screens as well as expose. I also learnt some valuable lessons whilst printing like doing it quickly as the ink dries in the screen and using the trace sheet to align your screen with your paper.It has expanded my opportunities in my process as I now feel more confident about using screen printing as an option in the future. It has allowed me to be able print colours that I can't create with digital such as fluorescent or metallic which could represent a spot colour which means in future briefs my process will be more informed with a wider scope of options. I also approached my website proposal using a different mode of production. I learnt aftereffects and created a motion demo of the website being used as still images didn't show how the features worked well.  This informed my design development as I know no how to design for motion and separating the files into layers to create parts to move and others to stay still. This also means that in the future if I wanted to show something in motion I can and it will increase the quality of my website design as I can demonstrate my ideas without lots of text. I also feel I was more creative in this module in my processes as I approached the exhibition poster completely different to others. I hand stitched the poster as it was personal craft I wanted to experiment in. This has opened my mind to other processes to approach briefs instead of just print.

What strengths can you identify in your work and how have/will you capitalise on these?

I feel that a strength in this work is that I researched into a range of the topic before hand and this helped inform me in designing for the subject. My research led on to further research and encouraged new topics to look at which then meant that my concept had a backbone and a purpose with an intended audience rather than fictions for something I wanted. I will capitalise on this strength by using my research in the future to focus my concept and audience as well use it to create appropriate designs and formats.This will make my work more professional as its function and purpose will be informed and it will mean my design process with be focused and organised. Another strength in this particular work is the quality of the final outcomes. I have in the past struggle to produce final pieces how I wanted them to but due to my organisation and pre planning I was able to produce a range of products to a more professional quality. I was pleased with the results of this module and even with minor defects and mistakes, which I have learnt from, I still came out with a range of products which work together as promotional material and would be happy to use as a demonstration of my graphic skills. I capitalised on my new skill in production of products by creating a range of different formats and designing more products as I went along. In the future this strength will be useful as it means I can produce final pieces for portfolio and it will also show my design as best as possible as the concept and idea might be there but if the final pieces don't show it then I won't be able to use them. 

What weaknesses can you identify in your and work and how will you address these in the future?

One weakness I spotted in this brief is photographing my process and products. I feel that I could of showed my products to be better with proper lighting and proper demonstrations of how they would be used/worked. This would of showed the function and context of the product and given better quality finish photos to use for portfolio. In the future I will try and book the photography studio and use an slr to take the photos of my final products. I will also produce mock ups of ideas I had which didn't complete or demonstrate properly such as the massive vinyl windows. Due to concentrating on actually producing final things it meant I didn't propose or mock up things as much as I have in the past. In the future I will balance the two and produce final products and propose others. Another weakness I have identified is that I didn't try out other colour schemes when I finalised my concept I went straight from the grey to bright pink. I could of tested out other colours before defiantly going ahead just to make sure it was the best option. In the future I will explore in more detail my colour options before making a final decision.

Identify 5 things that you will do differently next time and what do you expect to gain from these?

Propose/Mock up
Expand my ideas out into a further environment and express my ideas in visuals
Photograph finals
I will get good quality photos of my final pieces to use for my portfolio
Test Colours
Do test and trails of colours so I can make an informed decisions before I do finals
Draft Boards
I feel my boards could of been more focused and thought through, in future it will create a flow in producing my idea
Expand processes further
There are still a lot of things I need to learn by experimenting from different processes and this will expand my design production and concept skills


Attendance - 5
Punctuality - 5
Motivation - 4
Commitment - 4
Quantity or work produced - 4
Quality of work produced - 4
Contribution to the group - 5

Design Practice 2: Final Boards

Design Practice 2: Research Book Final


Final research book:

I wanted to print my research book on photo paper as there sized to be a collection of prints. I went to print them at Boots so that they printed like proper photos however it didn't find the files even though they were JPEGS. The women said this happens some times because there old and that it doesn't except any other file format. Once my initial plans were ruined I brought my own photo paper and printed them myself trimming them down to the correct size. To package the research photos I used a pouch that I had got from printing my own film which I think is authentic with it's spec and writing. This is an appropriate way to display my research as the format and packaging resembles that of analogue photography.

Monday 20 May 2013

Design Practice 2: Crit Boards

These are the boards I produced for the crit that show the development from the research that I did into the practice of my final products.

Design Practice 2: Website Demo


Even though I made sure each image was a vector in the file it is slightly pixalated for some reason. Also it appeared as a different speed when creating it as my computer was lagging with all the information. Therefore when it was made into a file it sped up to it's full speed which made it appear a lot quicker than expected. However for a first attempt at aftereffects which isn't the easiest thing to catch on to I was pleased with the result and it does demo the different features you just can't read through the information. It could be said that this is the speed that users flick through things particularly if they don't read the information so it shows that the website it user friendly and easy to navigate due to the large and stand out buttons such as share that tell the user quick and easily how to navigate through.

Design Practice 2: After Effects

Due to the technicality of my website proposal and the different features it had which were interactive and in motion I decided to attempt to create a demo of the website being used. To do this I needed to learn aftereffects so I looked online and used a trusty colleague of the course to help me with the basics so I could get the hang of it. The main things I learnt to use was the opacity tool and the position tool. These allowed to me transition between the different layers and illustrator files and also create motion with the page scrolling and the mouse moving.


The main issue I had was that I had originally arranged it in illustrator just as proposals pages so when placing them into after effects it meant aligning and getting rid of the backgrounds of pages as the layer was already there from before. For example when the hands are holding the photo I had the background faded out with the hands layered over the top but when I had to use in the animation I didn't need the background as the previous clip was the background. This meant I had to separate each part of my website up into different layers or files so they could overlay without having things repeated on top of each other.


I wanted to improve on my gif of before and make the feature not only flash but appear as if a camera was being used to take the photo. To do this I had the photo flash white and fade in like the snap logo faded from bold to thin. The transition of the photos also needed to be like a camera so I thought of how you turn to take photos and that creates a motion blur. Therefore I had the photos positioned at the side and have then move in in a motion blur under a white clipping mask so you only saw it within the circle. This gave the effect of the camera moving to the right and snapping another photo.


I had to separate the fixed bar to a new layer so that when the page below 'scrolled' up it stayed fixed and layered over the top. I made the page appear as if it was scrolling by positioning at the top and moving it upwards.


I also had the demo show features such as rollover colour changes. I positioned the mouse to move to the image and when it was there the page transform from one file to another though the opacity. This appeared as if the mouse had rolled over the same image.


Although it took quite a long time and was difficult to work out I was pleased with the result it  gave in demoing the features of the website. It's not a perfect file as i'm sure the layers could be better and reduced but as I worked from creating layouts for single jpegs to an animation I feel it went well. In the future I want to create the files in the hindsight of it being an animation therefore it will be a lot more simple and planned through as a motion image.

Design Practice 2: Perforated Ticket

These pictures show the perforated ticket would work in popping out the middle section when they enter through the door. The middle would be handed back to the customer and the outside kept to scan and for reference for the staff.


Design Practice 2: Promotional Material in context

This is a sample photograph of mine to show how the photo holder would be used. I added photo corners commonly used in photo albums or handmade photo books give a more authentic atheistic for the photo holder rather than just slits for the photos to slot into. This is for the complimentary photo the customer has chosen to take home. With the photo in place it just shows the text at the photo which tells the place and exhibition as a reminder. This would be ideal for the fridge, noticeboard or to put into an album itself as a token from the experience as the holder is the size of a 7 by 5 photo.


I added vinyl to the screen printed versions of the promotional material to show how it worked with the neon ink as well as the printed.


These photos show how the mail out photo pouch would work with standard printed photographs.